|
|
|
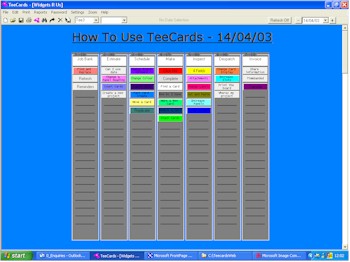
TeeCards is here to make life easier, it's trying to help you organise more efficiently, provide visibility to all who need it, replicate repetitive work quickly and easily, produce reports to aid your business and to help you plan in order that you can be more productive. TeeCards is a generic product: it is a tool which can help many businesses and many different industries, to that end you need to configure a project to suit your needs. You may have already done this with a conventional board without realising it; its just the same with TeeCards, you make decisions when you design your conventional board and you need to make similar decisions with TeeCards, but with TeeCards the mistakes are not so costly as you can create as many boards as you want and it is easy to change the configuration. Easy Decisions: Number of panels, Number of Slots, Colours, Names of the fields on the card (Alias) Less Easy Decisions: Stacked, Sticky, Timebanded, and whether to use date and Date Views in the display. These examples may assist in that decision. We start with simple examples and move to more complex examples, don't be daunted this is not rocket science Remember that the start date is all important, if you employ date in your board it is this date that determines when it will appear. The other important factor is the panel, you determine the panel, the panel is not determined by TeeCards, in the date driven boards positioning a card in a panel may determine the date, the date does not determine the panel. Some of this functionality is not available in TeeCards Lite. |
|
|
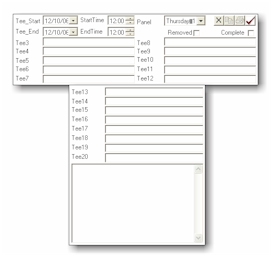
The Card. When a t-card is open it looks something like this, its delivered with our names on the card but you change them using Settings --- Project Settings --- Alias tab. Its here that you say Tee3 should show as 'Customer', Tee4 as 'Ref' etc etc. When the card is closed it sits on the board as it would with a physical system. You decide which of the fields you want to show on a closed card, you can show up to 5. So you may choose to show, Due Date, Customer and Ref. You can also put drop downs on the fields this saves time in typing. The drop down list builds from previous entries made in that field, so a separate list does not need to be maintained. There are 2 date fields, 2 time fields, 18 free format fields and a memo box. In the Plus systems you can get onto the back of the card, here you can store up to 32 numerical values. These are useful for costing and estimates. |
|
 |
Sticky board. This example is the closest you will get to a conventional board. It ignores much of the functionality in TeeCards, No date is used, the t-cards position themselves where you say they should be positioned. It simply is a T-Card Board on your PC. Go to Settings --- Project Settings - Timebanded tab, ensure the Timebanded check box is unchecked and the Use Sticky Positioning is checked. Any jobs which are closed can be hidden using the Removed check box on the card. This can be renamed to suit your industry. This applies throughout. |
|
Stacked board In this example we are beginning to use more functionality, t-cards are being positioned in the next available slot, the order in which the slots are occupied is determined by the sort order which can be a number of factors e.g as the t-cards were created (As entered), Alphabetically on a certain field, Alphabetically on a combination of fields. So you might want to give your card a priority. You might want to sort by colour (which may have a meaning) so the t-cards will be grouped together. This histogram like feel is attained by Settings --- Project Settings --- Timebanded tab ensure that Timebanded and Sticky are unchecked. Sort Order tab, the natural order is as they were created, if you want to use your own then check use custom sort order, clear anything that may already exist with the clear button, now pick the fields from the drop down to determine your sort order e.g. Colour. |
 |
|
Using Date The likelihood is that if you currently have a T-card board/Whiteboard you use date. Due to restrictions of wall space etc you may look forward 1 week, or 4 weeks and rearranging the board is a pain. TeeCards does this easily, it may not be in exactly the same way, but it offers more. There are a number of different ways date can be employed. In the first instance on the Settings --- Project Settings --- Sort Order tab check Use Date in the Selection. Now only t-cards for the specific date displayed in the date picker are shown, you move through dates either by using the date picker or the plus + and minus - signs either side of the date picker. You can use either Sticky or Stacked boards. There are a number of views you can employ Date Views Selected Date Only - This shows t-cards that match the date in the date picker. Selected Date and Prior - t-cards for the date picker date and those outstanding from the past. Using this method you can preload your board with future jobs but they will not appear until they need to. Selected Date and Future - t-cards for the date picker date and for the future. Using this method only up and coming jobs are shown, this presumes that all previous t-cards are no longer of any interest Prior Only. Future Only. Period Views Week View - The shows the week corresponding to the date in the date picker. Month View - As above but for Month Quarter View - As above but for Quarter Year View - As above but for the Year Rolling Days - a vertical legend for the days Scrolling Days - a horizontal view from a date Scrolling Weeks - a horizontal view from a date by week. Note when these views are used you can employ Deduce Date. This is an automated facility which changes the date on a card as it is dragged between days, or weeks. Similarly clicking on a panel assigns the appropriate date to a new card. This is affected by the ignore panel 1 setting where panel 1 may be being used as a label e.g. an engineer. Whilst visually there is no impact a true reflection will be given in any reports that are produced. See Week View below. |
|
 |
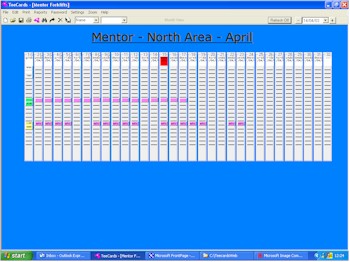
Week View To create a board like this which would be suitable for e.g. Service Engineers or Training: Use date in the Selection --- Sort Order tab must be checked. No of Panels set to 8 - i.e. labels plus 7 days The number of slots in this instance is 20. Large 20 max have been used in the card width. Select Settings --- Period View --- Week View. Settings --- Ignore Panel 1 is checked to ignore the labels in the first column in any drop downs and to help with Deduce Date. Settings --- Deduce Date must be checked this alters the date as the t-cards are moved (for whatever reason) between days. In this example all of the panel headings have been left blank apart from the first panel. TeeCards therefore populates with day and date in the heading and makes the date corresponding with the date picker red. |
|
Week View - read vertically This week view is not using panel 1 as labels so rather than reading horizontally across the board, this board is read vertically. It illustrates those vehicles to be serviced, in this case Blue is serviced, Red is Outstanding. Red t-cards are scheduled very 6 weeks, once serviced the card is changed to Blue and a new Red Card created for a repeat Service in 6 weeks time. Use date in the Selection --- Sort Order tab must be checked. This board is Stacked rather than Sticky so Sticky (on the Timebanded tab) is unchecked, the t-cards are sorted in this case by 'vehicle Id' the alias for Tee3 No of Panels set to 8 - 7 days and in this instance 'out of action'. The number of slots in this instance is 30. Large 20 max have been used in the card width. Select Settings --- Period View --- Week View. Settings --- Ignore Panel 1 is not checked as we do not want to ignore Panel 1. Settings --- Deduce Date must be checked this alters the date as the t-cards are moved (for whatever reason) between days. In this example all of the panel headings have been left blank apart from the last panel. TeeCards therefore populates with day and date in the heading and makes the date corresponding with the date picker red. |
 |
 |
Month View To create a board like this: Use date in the Selection --- Sort Order tab must be checked. No of panels set to 32, labels panel plus up to 31 days. Default 32 max has been used as the card width. Settings --- Period View --- Month View. Settings --- Deduce Date is checked. There are labels in panel 1 so 32 columns needed and ignore panel 1 is checked. In this example the screen has been zoomed to 50% so the whole month fits on the screen. |
|
Year View This example of year view assumes a 53 week view, but you could have a 12 month view. To create a board like this: Use date in the Selection --- Sort Order tab must be checked. No of panels is 54 - 1 label and 53 weeks. The number of slots can be between 1 and 100. In this example Year Saturday has been chosen, this shows each week start day as a Saturday in the panel heading which is great if you are a vacation company. You can choose between Year Monday, Year Sunday and Year Saturday. Settings --- Ignore Panel 1 is checked. Settings --- Deduce Date is checked. The week corresponding with the date picker is highlighted in red. By zooming to 33% the whole year can just be viewed on a 1024 x 768 screen |
 |
|
For those businesses where time is critical: e.g. Taxi companies, Dentists, Beauticians, Contract Cleaners we have Timebanded mode. |
|
 |
Timebanded Timebanded is a specific way of working it is ideal for people who want a daily/weekly/monthly planner involving time. To use Timebanded go to Settings --- Project Settings --- Timebanded tab and ensure the Timebanded check box is checked, input the start and end times the slot spacing and the slot interval. A card will now position itself depending on 3 factors: 1 the panel in which you have said it should be displayed. 2 the date corresponding to the Start date. 3 the time corresponding to the Start Time. To use Timebanded the Use Date on the Settings --- Project Settings --Sort Order tab must be checked. |
|
Timebanded with Block Time This example is the same as above but, Settings --- Block Time has been checked. This uses the End Time to determine when the job is finishing and sizes the card to occupy all of the time slots covered by the duration. This also used Zoom at 75% |
 |
 |
Week View, Vertical Day Display In the previous examples day has been represented horizontally, here it is represented vertically and t-cards automatically position themselves in the appropriate slot for the day. This only works in Week View. Use date in the Selection --- Sort Order tab must be checked. No of Panels set to 10 one for each process, but could be more The number of slots in this instance is 7, but could be more. Default 32 has been used in the card width. Select Settings --- Period View --- Week View. Settings --- Show Days Vertically is checked. To get the Days corresponding to the week on the vertical axis. |
|
Week View, Vertical Day
Display - With Block Time on - TeeCards Plus Only In the previous examples day has been represented horizontally, here it is represented vertically and card automatically position themselves in the appropriate slot for the day. This only works in Week, Month or Rolling Days. Use date in the Selection --- Sort Order tab must be checked. No of Panels set to 10 one for each process, but could be more The number of slots in this instance is 7, but could be more. Default 32 has been used in the card width. Select Settings --- Period View --- Week View. (or Month/Rolling) Settings --- Show Days Vertically is checked. To get the Days corresponding to the week on the vertical axis. Additionally in this example we are blocking the number of days occupied by the job. In this example the green card actually starts before the beginning of the week and finishes after the end of the week, and you will note it can not be seen in the example above. Jobs will not auto reschedule. |
 |
 |
Week View, Vertical Day Display - With
Block Time on, Reminders on- TeeCards Plus Only In the previous examples day has been represented horizontally, here it is represented vertically and card automatically position themselves in the appropriate slot for the day. This only works in Week, Month or Rolling Days View. Use date in the Selection --- Sort Order tab must be checked. No of Panels set to 10 one for each process, but could be more The number of slots in this instance is 7, but could be more. Default 32 has been used in the card width. Select Settings --- Period View --- Week View. Settings --- Show Days Vertically is checked. To get the Days corresponding to the week on the vertical axis. Additionally in this example we are blocking the number of days occupied by the job. In this example Reminders have been switched on, These are individual settings, configurable on either Start or End Time. They are set in minutes to provide a Red, Amber or Green reminder. |
|
Week
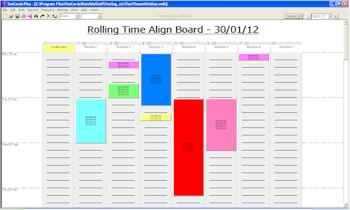
Rolling Days View, Vertical Day Display - With
Block Time on, with Time Align - TeeCards Plus Only In the previous examples day has been represented horizontally, here it is represented vertically and card automatically position themselves in the appropriate slot for the day. This only works in Week, Month or Rolling Days View. Use date in the Selection --- Sort Order tab must be checked. No of Panels set to 8 one for each machine, but could be more The number of slots in this instance is 7, but could be more. Large 20 has been used in the card width. Select Settings --- Period View --- Rolling Days. Settings --- Show Days Vertically is checked. To get the Days corresponding to the week on the vertical axis. Additionally in this example we are blocking the number of hours occupied by the job. This uses the End Time to determine when the job is finishing and sizes the card to occupy all of the time slots covered by the duration. In this example Timebanding on --- Start time 00:00:00 End Time 23:59:59. Slot Interval 04:00:00 Num, Slots Spacing 6 Thus allowing for a 24 hour day with 6 bands at 4 hour intervals. Other configurations are acceptable |
 |
|
2 up Display - TeeCards
Plus Only For some people 50 panels just is not enough, so 2 up has been introduced. This splits the board in 2 and thus enables 100 panels. The number of slots is reduced to a maximum of 40 in each panel. Of course you do not have to have 100 panels and in this example a smaller number of panels become more visible. In this example number of panels is 17. Number of slots is 12 Display Panels 2 up is checked. |
 |
|
|
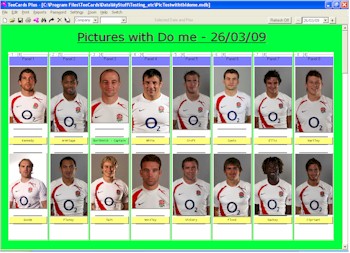
Picture
Board - Incident Board This is an example of a Picture board; think management structure, who's who, incident boards etc. The Tcard auto sizes for depth, and the board is best used in Sticky Mode in order that 'information' cards can be placed adjacent to the picture. |
|
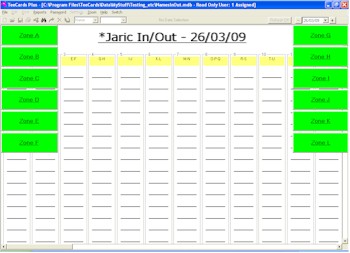
In/Out
Touch Screen We have also been asked to do an In Out board, used with a Touch Screen. So in this example the user would approach the board touch the button representing the Zone he worked in, T-Cards for that Zone would then be displayed upon the board split e.g. alphabetically. The User would then touch the TCard representing himself/herself. The t-card would then change to a predetermined colour indicating that they were In/Out of the building If you can see a use for this give us a call. |
|
|
Scrolling
Days and Scrolling Weeks In all of the examples above the t-card is effectively owned by a panel (a vertical column) you decide in which panel the card should reside. Recently 2 new methods have been introduced (Scrolling days and Scrolling weeks) whereby the vertical column represents a date or a week, using this method you do not physically decide the panel, the start date on the t-card does. This can be useful on date driven rather than a process driven board. Call us if you would like an example 08458 38 22 38 |
Repeater
Board Sometime ago a repeater board was requested, repeater is great if you have repetitive tasks e.g. garden maintenance and much of the information on the t-card is repetitive e.g. address, tasks and frequency. Call us if you would like an example 08458 38 22 38 |
|
We hope that these few examples have helped. We do have industry specific boards which may help you get started. We also have industry specific software. If there is anything you do not understand or would like to discuss then please do not hesitate to contact us. +44 (0)1562 884297
|
|